How do I create an advertising campaign?
Tabs
Advertising formats
How to create a Push Notification or In-Page Push campaign
How to create an OnClick (Popunder) campaign
How to create a Video Pre-Roll campaign
How to create an Instant Text Message campaign
Pricing models
How to create a CPC campaign (Push Notification, Video Pre-Roll and ITM)
How to create a smartCPA campaign (Push Notification, OnClick (Popunder), Video Pre-Roll and ITM)
How to create a smartCPM campaign (Push Notification, OnClick (Popunder) and Skim)
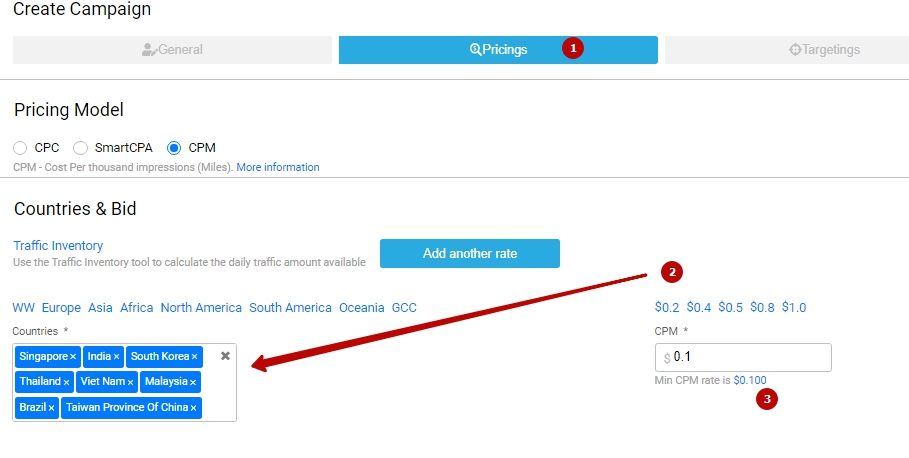
How to create a CPM campaign (all advertising formats)
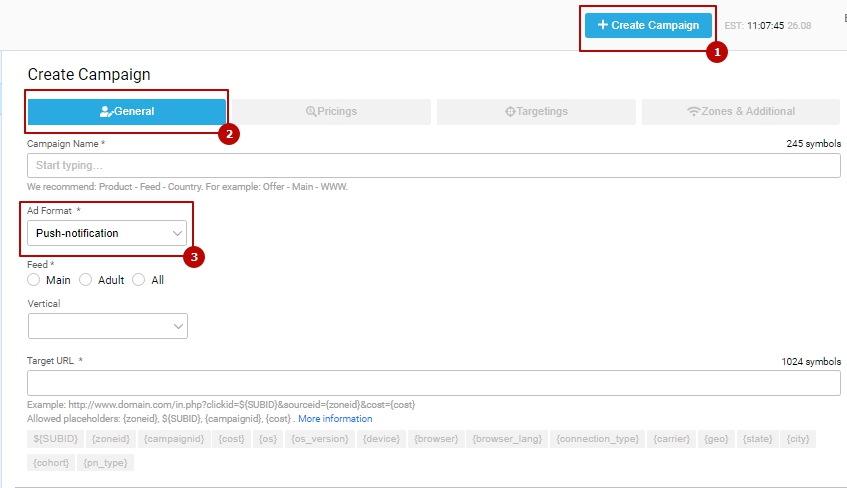
Let us introduce you to our brand-new campaign creation form. Now, it has 4 main sections that contain several settings to configure your campaign properly, and one of the important sections is ‘Campaign Summary’ located on the right side of the screen. This field has the general information about the settings of your campaign according to the data that you put in all those 4 pages:
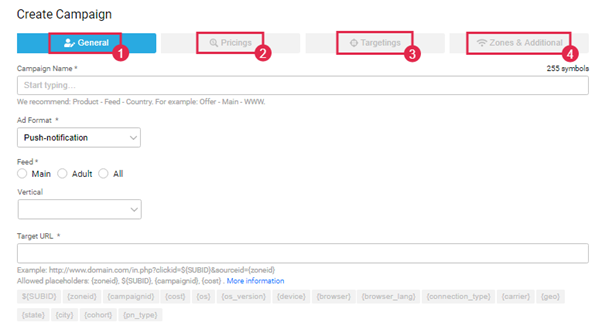
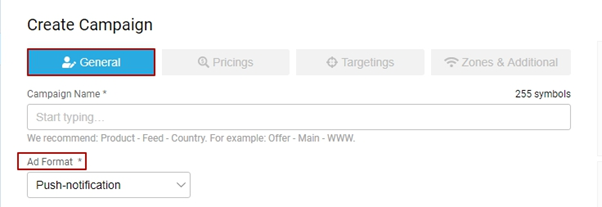
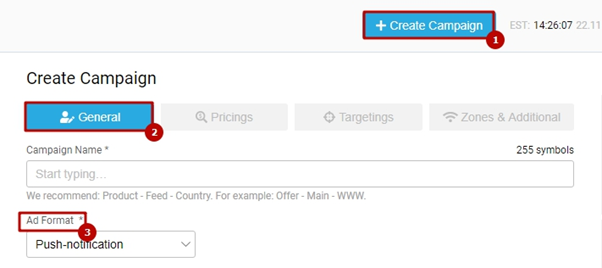
1. General
In this section, which is an essential one for campaign creation, you can (see the screenshot below):
- Type in the Name of your campaign;
- Select an Ad Format you want to run;
- Choose Feed for your ads. Feed refers to the category of your offer. If your offer is good to go on both available feeds, choose ‘All’, and you will receive all of our network’s traffic;
- Select an offer/website/product’s Vertical that you are going to promote (if you do not know the exact vertical of your offer/website/product, choose ‘Default’). This way, your campaign will be receiving traffic that’s most relevant to your offer’s vertical, and, as a result, more likely to bring good results;
- Provide a Target URL (a link) to your offer/website/product;
- Upload creatives/add extra format-specific settings (for Banner, Push Notifications, Video, and Instant Text Message).
Note: fields marked with an asterisk (*) on all pages are obligatory to be completed. You will not be able to start your campaign if at least one of them is empty.
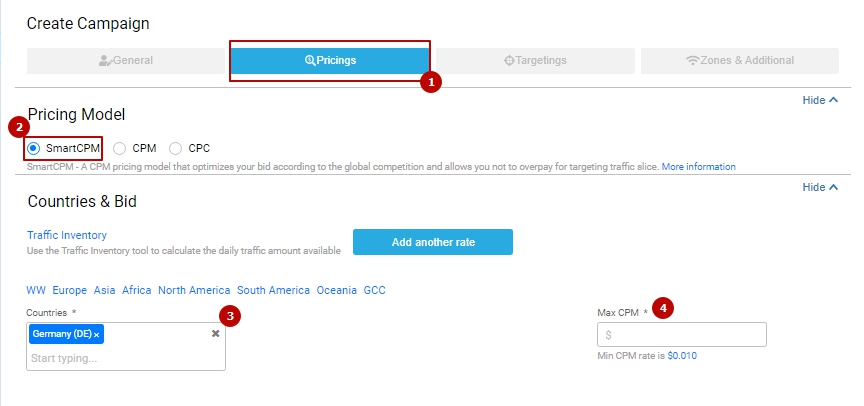
2. Pricings
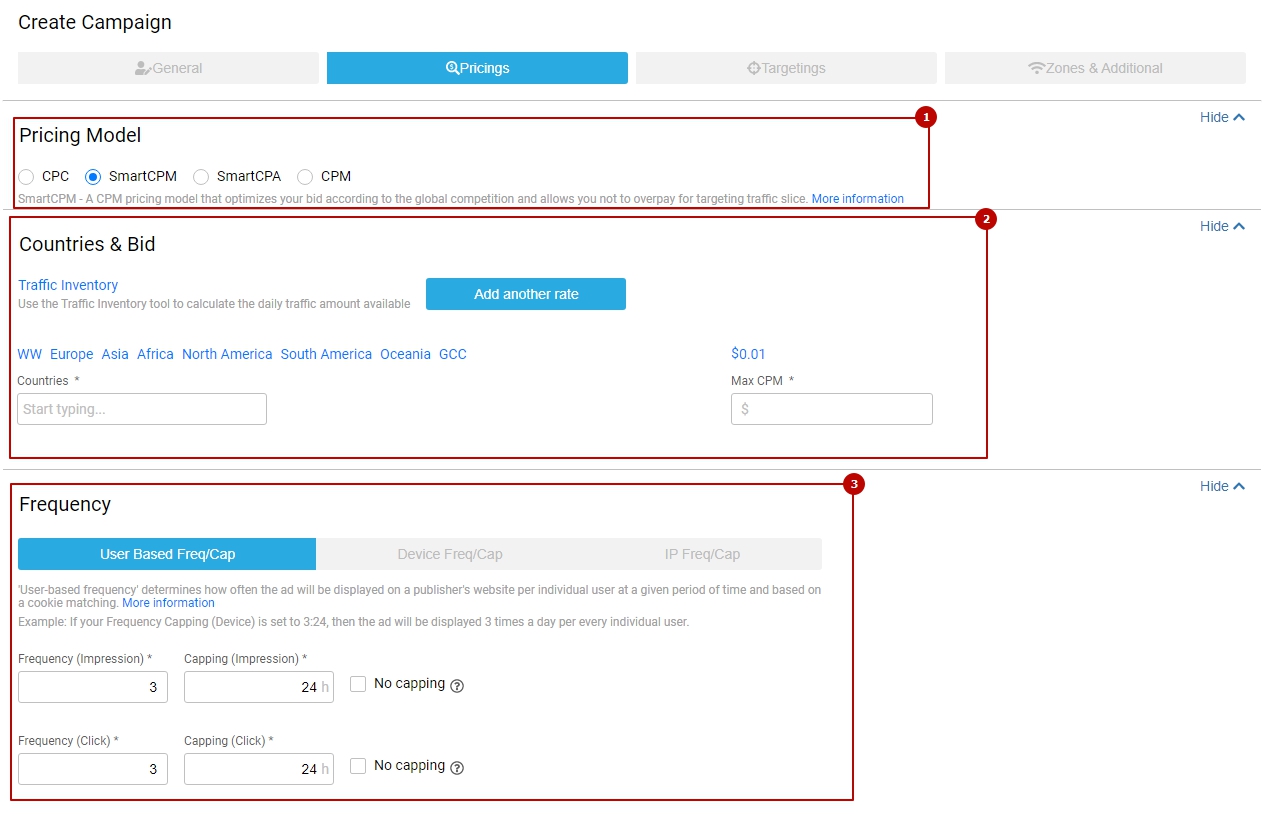
This section is for pricing and budget planning. Here you can:
- Choose a Pricing Model of your campaign (you can find more information about our pricing models here);
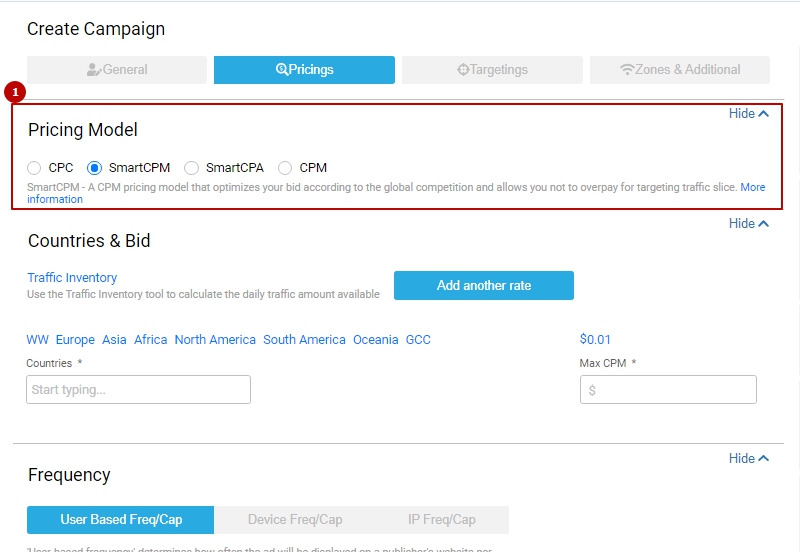
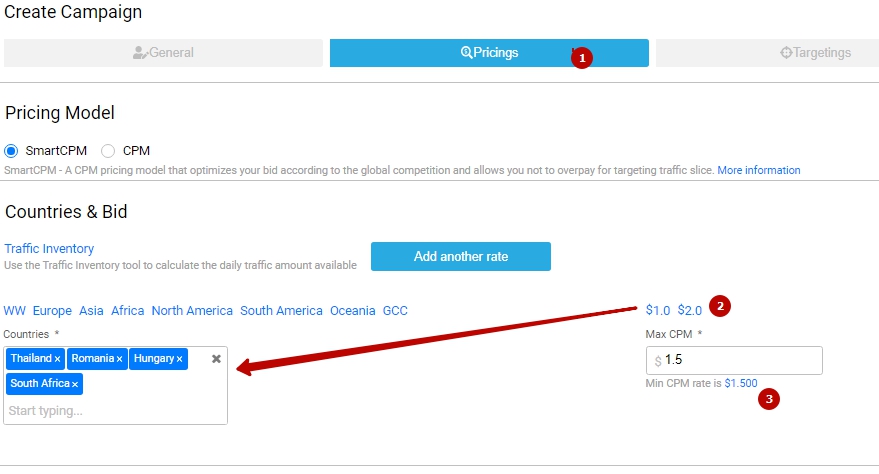
- Set a Geo/Country of targeting and choose a Bid/Price (all relevant bids for different ad formats are available in ‘Traffic Inventory’ for registered users only)

-
-
-
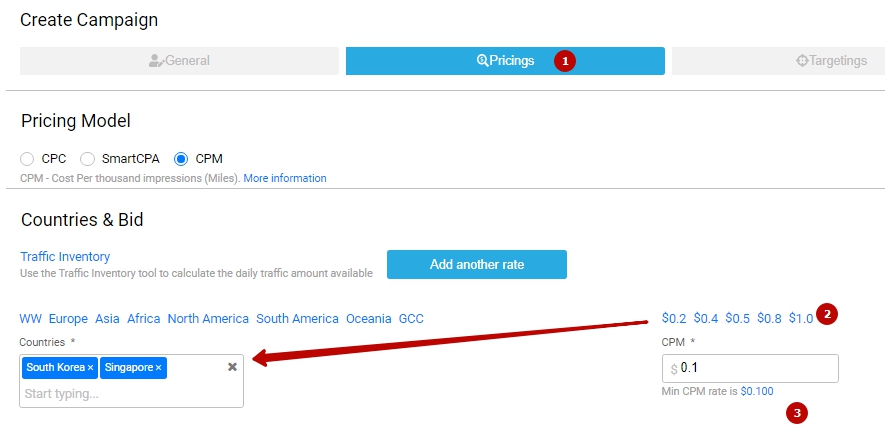
- You can set a bid for each Geo by pushing the Add Another Rate (1) button (available only with SmartCPM & CPM)
- What’s more, here you can choose a pre-set multi-country targeting by clicking on one of the settings shown on the screenshot below (‘WW’ - for all available countries, ‘Europe’ - European countries only, ‘Asia’ - Asian countries, and so on). On the right side, you will also see a pre-set bid you can click on to choose it as your campaign’s cost.
Below the CPM field (2), you can click and choose the minimum CPM for the targeted country (available on CPM/smartCPM)
-
-

Note that multi-targeting pre-sets are currently available on CPM and smartCPM pricing models only.
If you want to know about relevant bids, but you have not registered an account yet, you can contact our Support Team via live-chat that is available in the bottom right corner of the page.
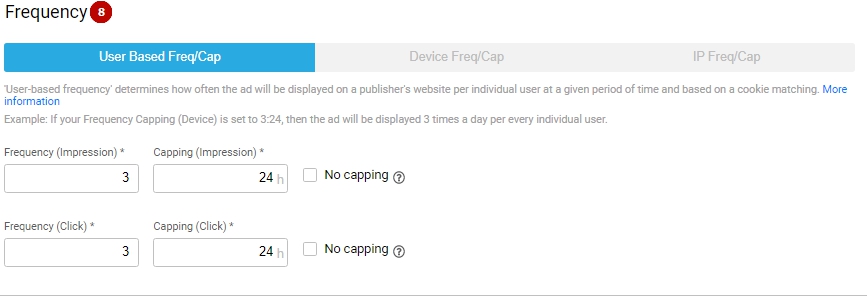
3. Set Frequency Capping for impressions and clicks. It refers to how many times (Frequency - times) your ad will be shown to the same user during a certain period (Capping - in hours). For example, 3/24 Frequency Capping for impressions means that a single user (when you choose the user-based frequency) will be shown your ad 3 times in a row within 24 hours;
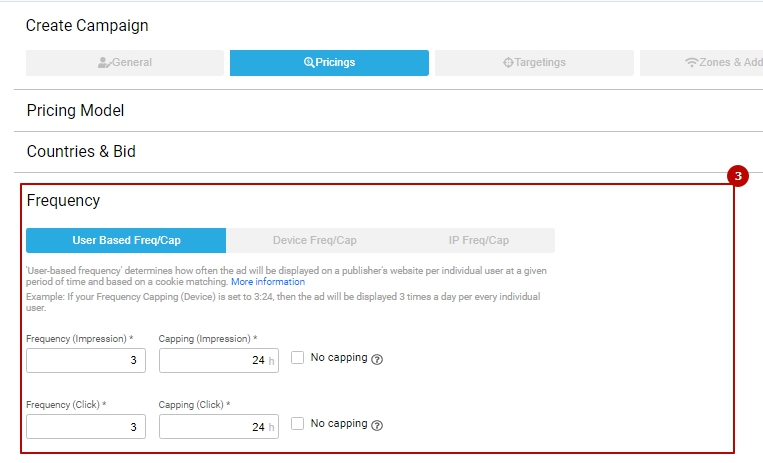
What is more, you can select which type of 'Frequency' you would like to apply for your campaign's activity. You can see the three main types here:
(1) User-based frequency capping: it defines how often your ad will be displayed on a publisher's website to an individual user at a given time. It's based on cookie matching and set by default;
(2) Device-based frequency capping: it is based on how many times an ad will be shown to a user with a single unique device ID;
(3) IP-based frequency capping: here you can set how many times an ad will be shown to a user(s) with the same IP.

4. Set your Daily Campaign Budget and Total Campaign Budget. Use these fields if you want your campaigns to stop after they have spent a certain amount of $$$.
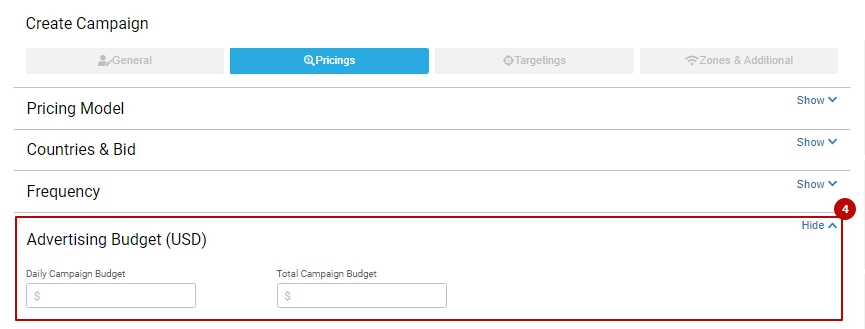
- For example, if you have set your daily budget to $30 and your total budget to $90, your campaign will be automatically paused once it’s spent $30 in one day. Then, after your campaign’s total expenses reached $90 (in this case, it’d have been running for 3 days in a row), it will be stopped and acquire a ‘Complete’ status.
- If your campaign has stopped receiving traffic due to reaching the Daily Budget or Total Budget, you can either increase your campaign’s budget to restart it or leave these fields empty (they’re empty by default!);
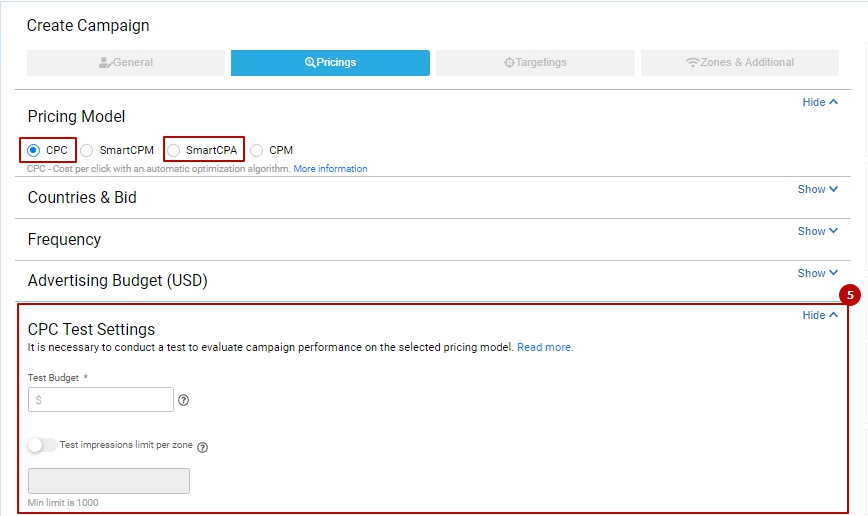
5. Set a Test Budget and other test settings (only for CPC (Except CPC with Banner) and SmartCPA pricing models).
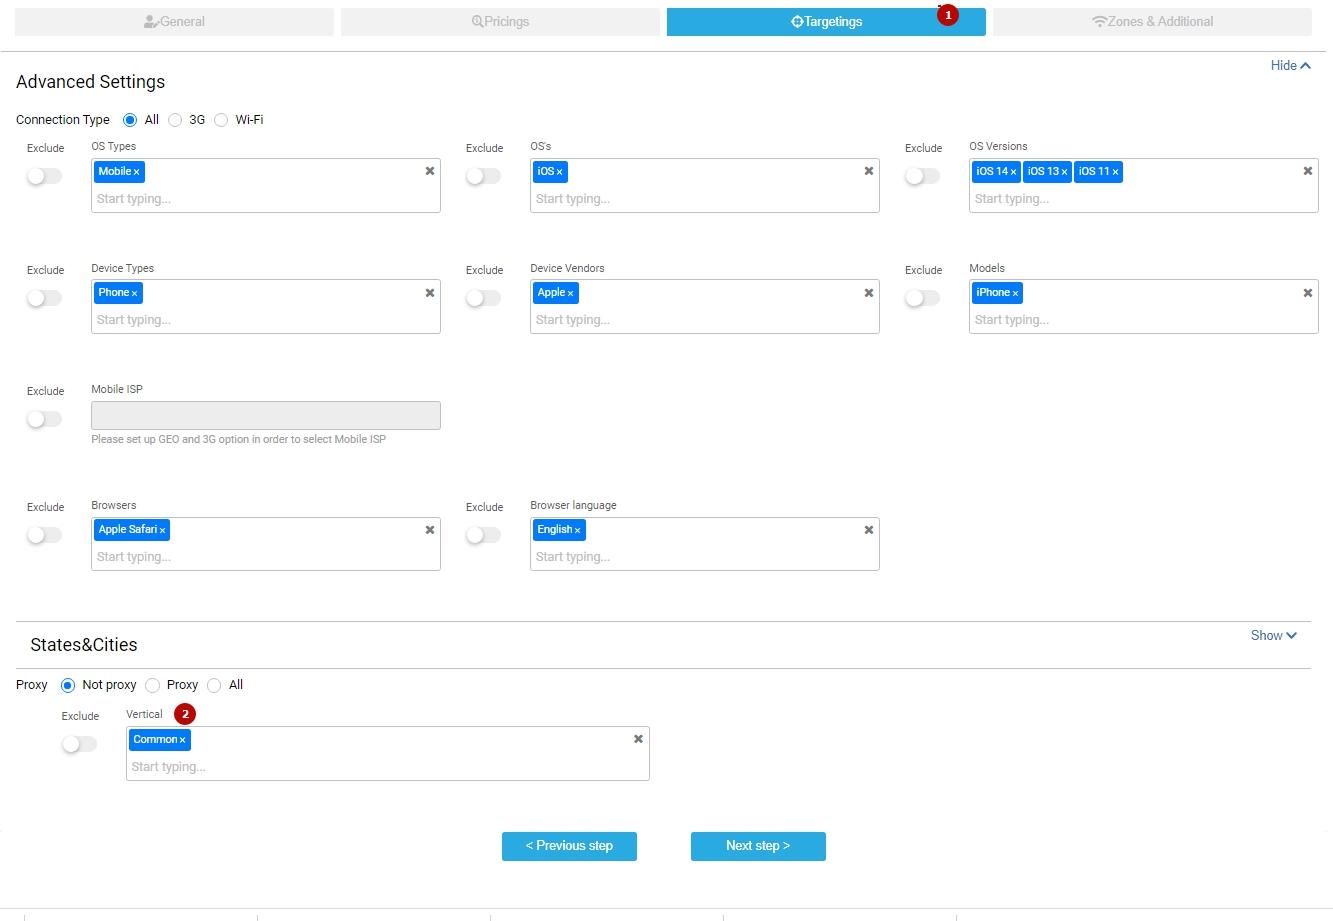
3. Targetings

This page helps you to set specific targeting settings so that your campaign is getting only the most suitable traffic for your offer. You can either include certain targeting (it is in the ‘include’ mode by default!) or exclude it from your campaign’s traffic delivery by clicking on the ‘Exclude’ switcher  so that it turns red:
- Connection Type (‘3G’ - only mobile carrier traffic, ‘Wi-Fi’ - only traffic from devices connected to Wi-Fi, ‘All’ - both kinds of traffic);
- OS types (Mobile, Desktop, or Other), OSs (Android, iOS, etc.), OS versions;
- Device Types (Phone, Tablet, Other), Devices Vendors (e.g. Apple, Samsung or any other vendor) and Vendors Models;
- Mobile ISP (carrier) (only for 3G connection type);
- Browsers and Browser language. We recommend setting the ‘Browser language’ targeting if you need to receive traffic from users who speak a certain language, or if you’re targeting a country with more than one common language spoken;
- State and City targeting. Here you can choose to target only specific states and/or cities in a chosen country. Note that the 'State' field is related to province/land in the chosen country set in 'Pricings' first (the GEO field);
- Proxy/Not proxy. If you choose the ‘Proxy’ option, you will receive traffic from both users with genuine IPs and those who are masking their real IP addresses and using another country’s IP instead. The ‘Not proxy’ option allows you to get traffic only from first-hand IP addresses. ‘All’ settings will get you both kinds of users.
4. Zones & Additional
Last but not least. This page allows to:
- Add zones (‘Zone Limitation’ field) that you want to Include (let your campaign work only within these zones) or Exclude (your campaign will not work on these zones, but will work on all others). Click on the
 switch to exclude these zones.
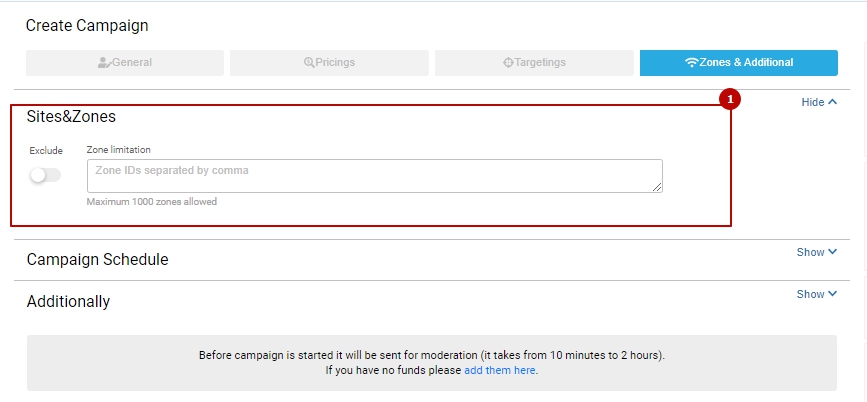
2. Set campaign schedule: note that our platform is working according to the EST time zone. If you want your campaign to work during a specific period, you should calculate the time zone of the geo you are running your campaign on.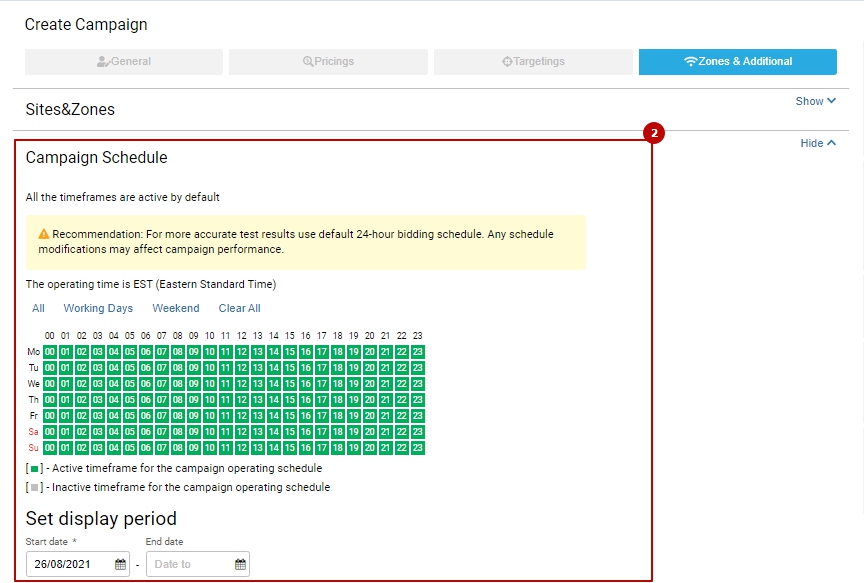
3. Select the ad delivery method (for more accurate tests and correct stats, we recommend leaving these settings as they are);
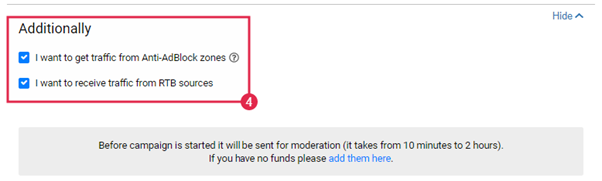
4. Choose Anti-Adblock Zones and RTB traffic (third-party traffic, not from our direct Publishers).
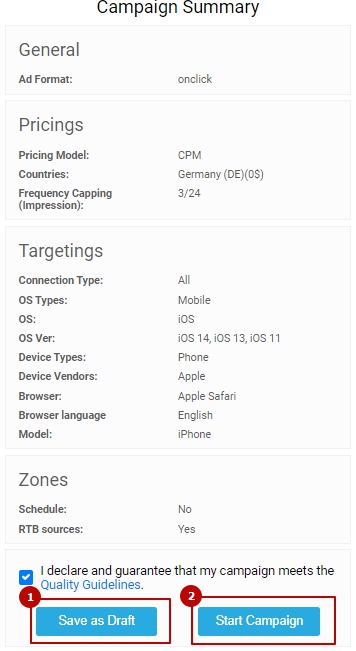
After all the steps are complete, you can go through your campaign’s overall settings once again by looking at the ‘Campaign Summary’ section on the right side of your page. It is quite convenient and saves your time. This section is divided into 4 parts that correspond to the ‘Create Campaign’ sections:
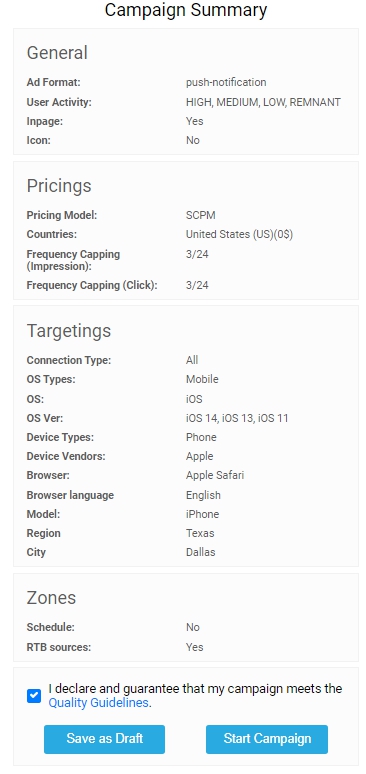
Note: if you are not ready to launch your campaign, you can save it as a draft.
Do not forget to tick the Quality Guidelines compliance field before starting the campaign.
How to create a Push Notification or In-Page Push campaign
A user subscribes to receive Push Notifications on a Publisher's website. Once a user is subscribed, they will receive a push notification ad that consists of an icon, creative, title, and a short description. By tapping on a notification, a user is redirected to your advertising campaign’s landing page/target URL.
To create a Push Notifications campaign, go to the ‘General’ section and select ‘Push Notification’ on the ‘Ad Format' section (as shown on the screen).
User Activity
The next important step of creating a Push notification campaign is setting the ‘User Activity’ level:
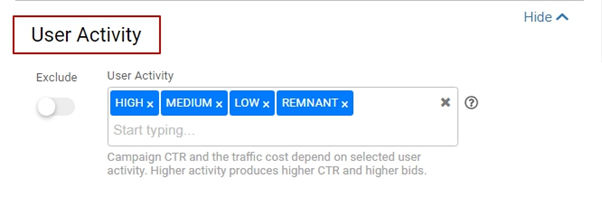
In this section, you can set user activity levels for the push traffic that will be sent to your campaign. We recommend creating 3 separate campaigns for each user activity level to see what works best for your offer: the first one for ‘High’, the second one for ‘Medium’, the third one for ‘Low’, and the fourth one for ’Remnant’. In general, the ‘User Activity’ level refers to the time that passed since a user has subscribed to receive notifications on a Publisher’s website. Each level corresponds to the following periods (you can also access this information by clicking on a ‘?’ sign next to this setting):
- ‘High’ - a user has been subscribed for less than 3 days;
- ‘Medium’ - a user has been subscribed for 4-10 days;
- ‘Low’ - a user has been subscribed for more than 10 days;
- ‘Remnant - a user has been subscribed for more than 61 days.
In this way, targeting only ‘High’-ly engaged users will allow you to set a higher bid and get push traffic of higher quality than usual, whereas targeting ‘Low’ and ‘Remnant’ traffic at a low cost will allow you to buy a lot of remnant traffic in bulk.
Overall, this setting helps you test how effective your campaign/offer will be with different settings and, thus, further optimize your campaigns.
InPage Push
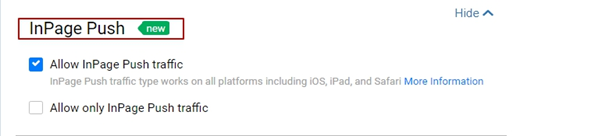
To increase the Push traffic efficiency, we boost your Push Notifications campaigns with the InPage Push Traffic type.
The main benefit of the InPage Push traffic is that in-page engages users that browse Publishers' websites in real-time mode. Moreover, InPage is compatible with all operating systems so you can target iOS users as well.
To enable InPage push traffic on your campaign, find the ‘InPage Push’ section when creating a Push Notification campaign and click ‘Allow InPage Push traffic’. If you would like to create a standalone InPage advertising campaign, choose the ‘Allow only InPage Push traffic’ flag.
Creative settings
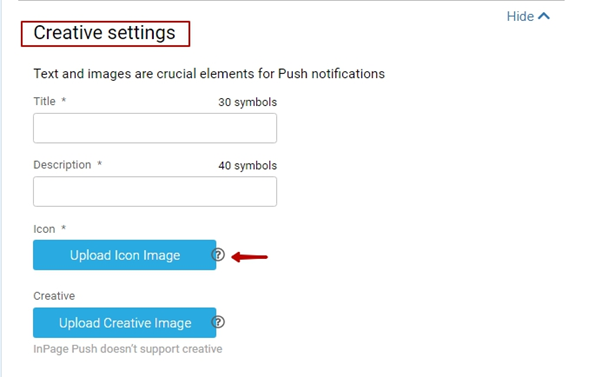
Description, Title, Icon, and Creative are the required creatives for a Push Notification campaign (the same goes for InPage push campaigns, but it doesn’t have a creative (bigger image)). The text boxes allow 30 symbols for the title and 40 symbols for the description.
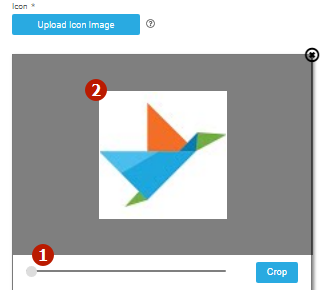
Further, you will need to upload icon and creatives images and use scaling (1) and cropping (2) tool to get the desired result (see the screenshot below). To crop an original picture, upload it first and then scale and select an area you’d like to keep as an icon/creative for your push campaign.
Please note: InPage Push ads do not support large creatives (banners).
If you click on the ‘?’ icon on the ‘Upload Icon Image’, the format requirements for icons and creatives will appear. For an icon, allowed formats include .jpg, .png, the minimum width and height are 192x192, max. size is 200 KB. For a creative, requirements are .jpg, .png format-wise, minimum width and height are 360х180, max. size is 720 KB.
How to create an OnClick (Popunder) campaign
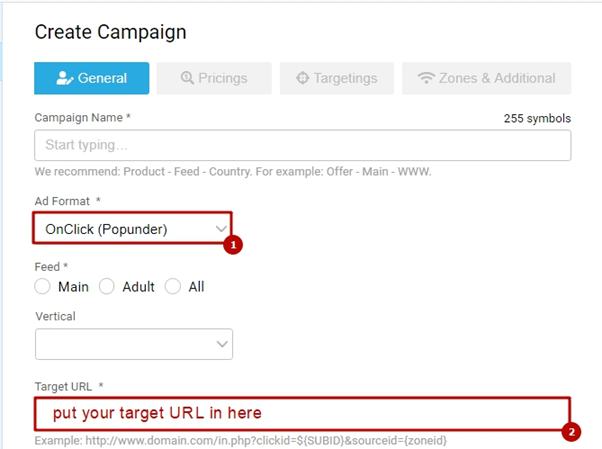
Popunder and Skim campaigns are created similarly. You do not need any creatives to run Popunder or Skim campaigns, only a Target URL that leads to a (pre-)landing page or directly to the offer/product you would like to promote. Then, after a user has clicked on a certain element on a Publisher’s website, a Popunder window leading to your campaign’s URL is automatically opened in an additional window or a tab.
To create a Popunder campaign, you need to select the ‘OnClick (Popunder)’ ad format and put your target URL leading to the offer/product to be promoted in the ‘Target URL’ field.
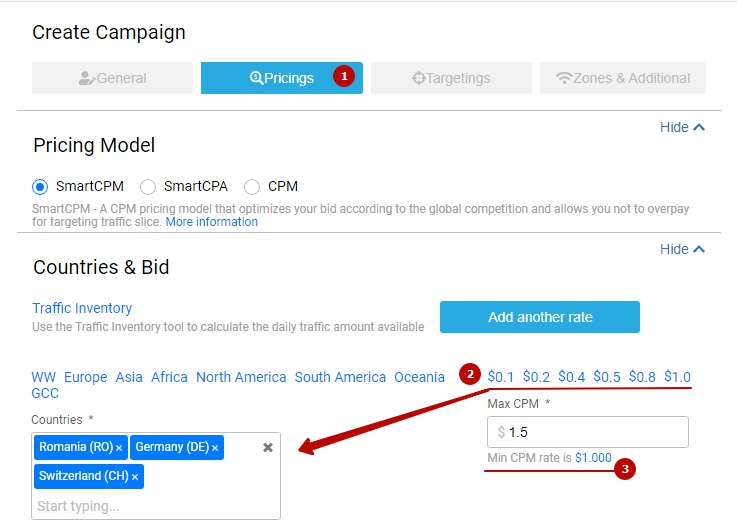
Further, when you set a bid (‘Pricings’ section (1)) for your Popunder (onclick) campaign, you will be able to use pre-set bids (2), as shown on the screenshot below, that will allow you to choose target countries that have the same minimum CPM rate. Below the CPM field (3), you can find the minimum bid for a specific country and apply it to the campaign by clicking it.
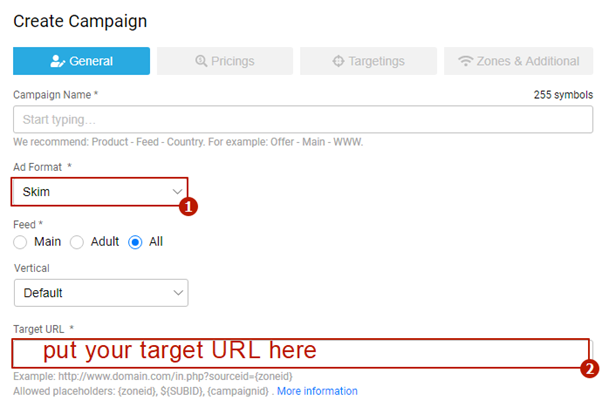
How to create a Skim campaign
To create a Skim campaign, you need to select the ‘Skim’ ad format and put your target URL leading to the offer/product to be promoted in the ‘Target URL’ field.
Further, when you set a bid (‘Pricings’ section (1)) for your Skim campaign, you will be able to use pre-set bids (2), as shown on the screenshot below, that will allow you to choose target countries that have got the same minimum CPM rate. Below the CPM field (3), you can find the minimum bid for a specific country and apply it to the campaign by clicking it.
Vertical (‘Targetings’)
After you have set both ‘General’ and ‘Pricings’ sections, head to ‘Targetings’ (1), where you will see another peculiar setting available for Skim campaigns only – the ‘Vertical’ (2) targeting option. Here you can either select or exclude website types you would like to receive Skim traffic from.
Last but not least, Skim campaigns allow you to track what website vertical you receive traffic from by using the {source} token. Implement this token when you configure postback, and you’ll receive this information on your tracker’s/affiliate network’s side.
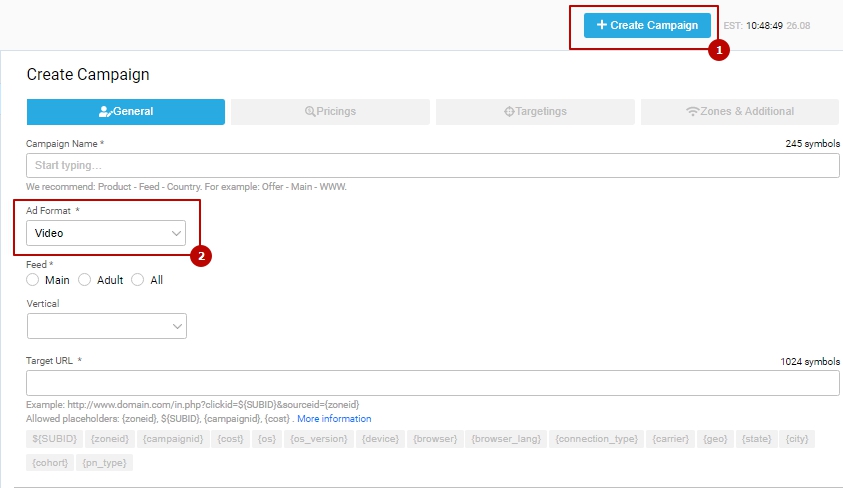
How to create a Video Pre-Roll campaign
Go to the ‘Create Campaign’ page (1) and choose ‘Video’ in Ad Format (2).
Next, you need to upload your video creative.

Please choose a video file (1) that is compliant with the technical specifications listed below. Take into account that a skip offset (2) (time after which a user can skip a video ad) is always 5 seconds. Afterwards, press 'Next step' (3) to continue creating your campaign.
You can always access a list of requirements by clicking on a ‘?’ sign in the ‘Upload Your Video’ section.
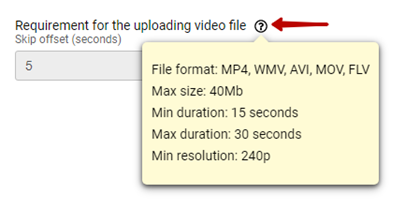
Make sure your file meets the requirements listed above before uploading it.
After that, you can also decide what pricing model you will be running your campaign on. Go to the 'Pricings' page (1) and choose the price model (2). Video Pre-Rolls are available on CPC, CPM, and SmartCPA models. (You can find more information about our different pricing models available on our platform in the ‘Pricing models’ section of our F.A.Q. for Advertisers.)
Further, when you set a bid (the ‘Pricings’ section (1)) for your Video Pre-roll campaign, you will be able to use pre-set bids (2), as shown on the screenshot below, that will allow you to choose target countries that have the same minimum CPM rate. Under the CPM field, you can find a minimum CPM value (3) for a specific country. If you click it, the rate will be applied to the campaign automatically.
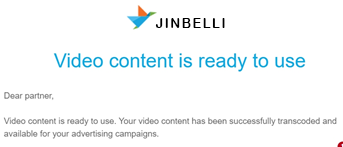
Once you have saved or started your video campaigns, a video creative will be automatically uploaded and processed by our system. Kindly note that it may take some time for your video to be transcoded (usually no more than 10 minutes). You will receive an email when it has been processed by our system, which means that your Video Pre-Roll ad is ready to go.
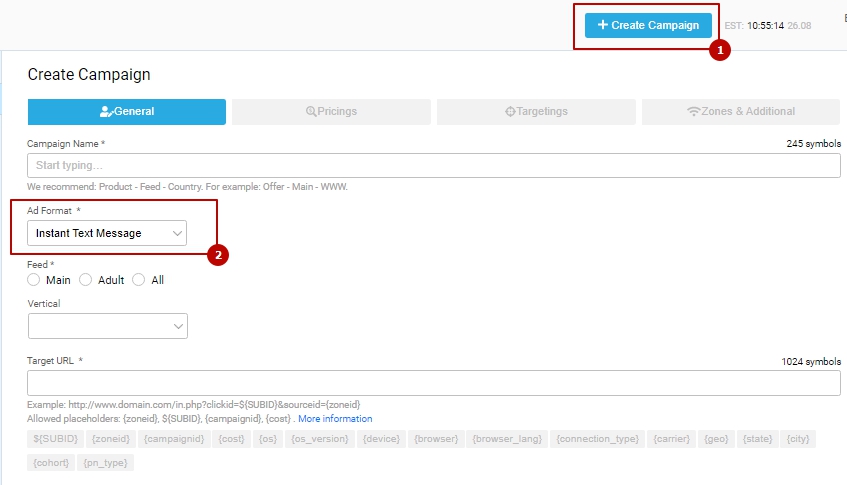
How to create an Instant Text Message campaign
Go to the ‘Create Campaign’ page (1) and choose ‘Instant Text Message’ in Ad Format (2).
Content Settings
Next, you will need to upload your creative (the text of the actual message).
Instant Text Message/Mobile Dialog Ad campaigns are easy to set up. Here you have to pay attention to the ‘Content Settings’ page where you can type in your instant text message’s title and its message text:
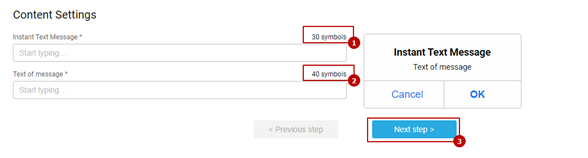
Please mind that the ‘Instant Text Message’ field cannot contain more than 30 symbols (1), whereas ‘Text of message’ allows you to include up to 40 symbols (2) in your message.
To the right of ‘Content Settings’, you can have a look at the preview of your Instant Text Message ad to see how exactly your ad will look like.
After that, you can decide what pricing model you will be running your campaign on. Go to the Pricings page (1) and choose the price model (2). Instant Text Message is available on CPC, CPM, and SmartCPA models.
What’s more, when you set a bid (the ‘Pricings’ section (1)) for your Instant Text Message campaign, you will be able to use pre-set bids (2), as shown on the screenshot below, that will allow you to choose target countries that have the same minimum CPM rate. Under the CPM field, you can find a minimum CPM value (3) for a specific country. If you click it, the rate will be applied automatically to the campaign.
How to create a CPC campaign (Push Notification, Video Pre-Roll and ITM)
In order to create a CPC campaign, go to the ‘Create Campaign’ page (1), ‘General’ section (2) and choose Push Notification, Video Pre-Roll, or ITM in Ad Format (3).
Switch to the ‘Pricing’ section (1) and select the CPC pricing model (2).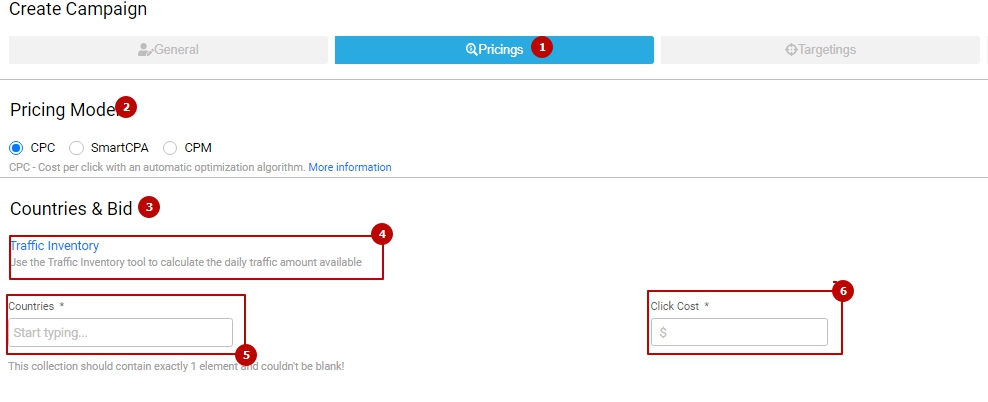
After that, find the ‘Countries & Bid’ (3) section. Here you need to select countries to target. If you are interested in traffic volumes or average and maximum bids, we highly recommend that you use the ‘Traffic Inventory’ (4) tool. This tool calculates the daily traffic amount available, according to the campaign settings and selected targeting options. The data is based on the previous day's traffic performance.
In the ‘Countries’ field (5) select a country you would like to target in your campaign. Note that it is possible to add only 1 country for a campaign on the CPC pricing model. Set a click cost for your campaign in the ‘Click Cost’ (6) field on the right. To set a competitive click cost, familiarize yourself with the data in ‘Traffic Inventory’ or contact your personal manager to get recommendations. The minimum CPC for all GEOs is $0.001.
The next step is to set frequency capping (8). The 'frequency capping' determines how often (Frequency) ad will be displayed on a publisher's website per individual user/IP/device at a given period of time (Capping). On a CPC campaign, you can choose the frequency capping of impressions and clicks as well.
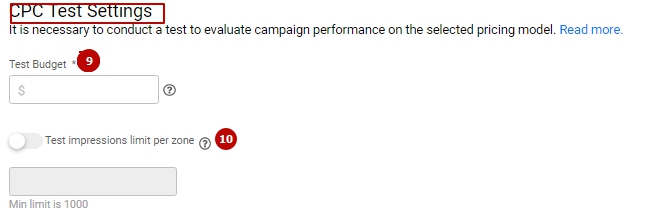
CPC Test Settings
Kindly note that if you wish to run your campaigns on the CPC pricing model, you need to set test settings at the bottom of the page for such campaigns:
- Test Budget (9) is the amount of funds that will be deducted from your balance if the cost of produced clicks won’t cover the expenses for the tested traffic.
This can happen in case your creative has a low CTR or low CPC (for CPC). The higher your Test Budget is, the more zones and traffic you will be able to test.
- Test impressions limit per zone (10) - this option excludes zones from the test that don’t provide a single click for a fixed volume of impressions.
How to create a smartCPA campaign (Push Notification, OnClick (Popunder), Video Pre-Roll and ITM)
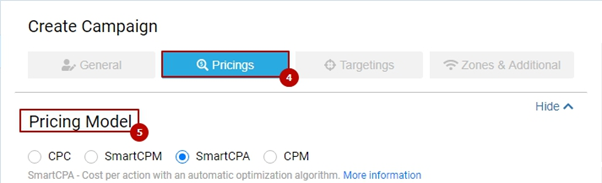
If you would like to create a SmartCPA campaign, go to the ‘Create Campaign’ page (1), ‘General’ section (2) and choose Push Notification, OnClick (Popunder), Video Pre-Roll, or ITM in Ad Format (3).

After that, switch to the ‘Pricings’ (4) section and select the SmartCPA pricing model (5).
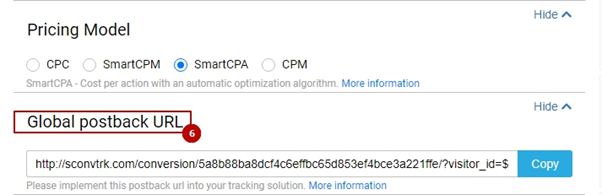
Take into account that if you choose the SmartCPA pricing model, you have to set the postback integration between Jinbelli and your tracker/affiliate network (6).
You can find a ready-to-use Postback URL for the most commonly used trackers in the ‘Tracking’ section of our platform (refer to the article about this section to learn more).
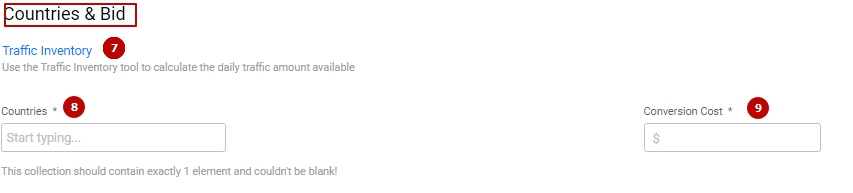
Countries & Bid
After that, find the ‘Countries & Bid’ section. Here you can select the countries to target. If you are interested in traffic volumes or average and maximum bids, we highly recommend that you use the ‘Traffic Inventory’ (7) tool. This tool calculates the daily traffic amount available, according to the campaign settings and selected targeting options. The data is based on the previous day's traffic performance.
In the ‘Countries’ field (8) select a country you would like to target in your campaign. Note that it is possible to add only 1 country for a campaign on the SmartCPA pricing model. Set a conversion cost for your campaign in the ‘Conversion Cost’ (9) field on the right. The conversion cost depends on your offer payout and should equal approximately 60-70% of your payout.
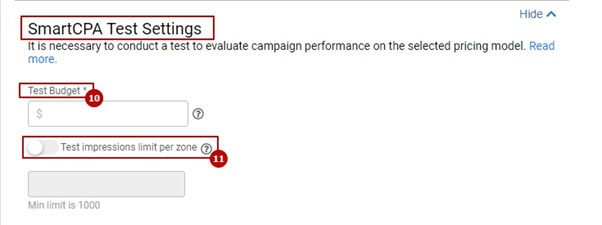
SmartCPA Test Settings
Kindly note that if you wish to run your campaigns on the SmartCPA pricing model, you need to set test settings at the bottom of the page for such campaigns first:
- Test Budget (10) is the amount of funds that will be deducted from you if the cost of produced conversions won’t cover expenses for the tested traffic.
This can happen in case your offer does not get any conversions at all or if the cost of the received conversions is lower than the price of the traffic that has been tested. In general, the higher your Test Budget is, the more zones and traffic you will be able to test.
- Test impressions limit per zone (11) - this option excludes zones from the test that don’t provide a single conversion for a fixed volume of impressions.
How to create a smartCPM campaign (Push Notification, OnClick (Popunder) and Skim)
SmartСPM is a pricing model based on the principle of a second-price auction.
What does it mean?
If you choose this model, you set a maximum CPM price that you are willing to pay, but the actual price will usually be lower due to the second-bid auction system. Your bid will be based on the next lower price on the slice of your campaign’s targeting. However, this cannot exceed the price you have set when starting a campaign. Thus, this model helps to reduce the cost of the CPM and remain competitive on the slice of your offer.
What’s more, with the smartCPM pricing model, you can use a {cost} token to see how much you pay for traffic (impressions) on each of the zones.
To create a smartCPM campaign, go to the ‘Create Campaign’ page (1), the ‘General’ section (2), and choose Push Notification, OnClick (Popunder), OR Skim in Ad Format (3).
After that, you need to go to the ‘Pricings’ page (1) and choose the SmartCPM price model (2), country (3), and the maximum CPM bid (4) you are ready to pay for 1000 impressions:
What is the difference between CPM and SmartCPM?
- Of course, optimization! The biggest advantage is that the SmartCPM pricing model helps to determine a CPM bid level that is most appropriate for every zone your campaign is running on and lets you remain competitive, while with the CPM pricing model, you will pay one fixed bid for all zones. Another great advantage is that you can set an individual custom bid (max CPM price) for every zone your campaign received traffic from. In order to do this, you need to expand a smartCPM campaign’s stats on the Dashboard page, click on a ‘pencil’/edit icon next to an individual zone’s CPM price and enter your own bid (please, bear in mind that it cannot be lower than a minimum CPM set for the geo of your campaign’s/certain zone’s targeting).
- Custom bids for zones will help you to pay less for the traffic from zones that do not bring a lot of conversions, but you’d still like to keep receiving traffic from them at a lower price than on other zones. Conversely, you can increase CPM for zones where your campaign receives most conversions. This way, you will be able to optimize your campaign’s expenses and increase its effectiveness.
Start working with SmartCPM now, and let the formula optimize your campaign!
How to create a CPM campaign (all advertising formats)
CPM is a cost per mille (1000 impressions) model. You can set a flat CPM rate, which you are willing to pay for every 1000 advertisements (impressions) in the selected format. This pricing model is available for all advertising formats.
To create a CPM campaign, go to the ‘Create Campaign’ page (1), ‘General’ section (2), and choose Push Notification, OnClick (Popunder), or Skim in Ad Format (3).
After that, you need to go to the Pricings page (1) and choose the CPM pricing model (2), country (3), and the CPM bid (4) you want to pay for 1000 impressions. Under the CPM field, you can click on the minimum CPM value (5) for the selected country and apply it to the campaign:
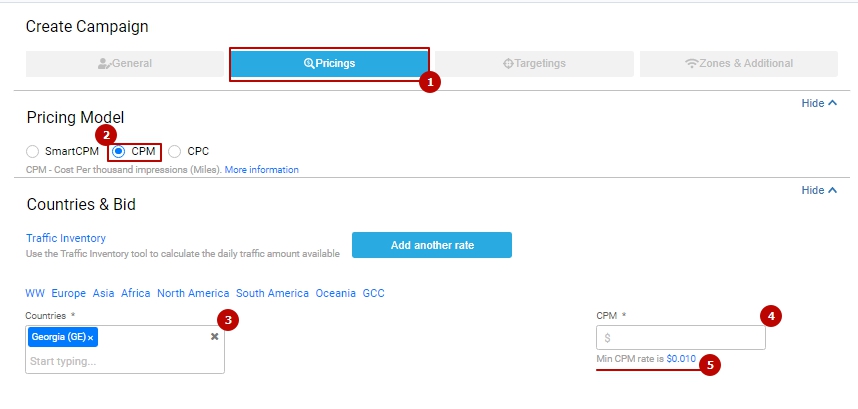
Fill in other fields and set the rest of a campaign’s settings as usual.
Complete the campaign creation and either save it as a draft (1) or start it straight away (2):